Bitnami-packaged open source software is loved by developers for its ease of use, which enables developers to directly pull a Bitnami package and seamlessly start using it with little effort. The fact that Bitnami-packaged open source software accounts for over 3 billion pulls per year on DockerHub is a testament to its popularity among developers. But, apart from the ease of use, we also aim to make our software inherently more secure and reliable by updating packaging practices per industry standards. That’s why, over the past few weeks, our team has worked on improving the security of Bitnami-packaged Helm charts.
As a starting point for these improvements, we decided to leverage the risk analysis, security compliance, and misconfiguration scanning capabilities of Armo’s Kubescape (an open source Kubernetes security platform). The best practices codified as controls by Armo helped us identify a list of preventative, detective, or corrective measures, which we then implemented. Some of the major improvements we have completed are listed below.
Enabling containers to function without group root
Until now, Bitnami charts used user 1001 and group root (following Openshift standards). However, Kubernetes platforms increasingly encourage the use of more secure configurations for applications, which does not allow for the use of the group root. With the new changes, Bitnami containers and Helm charts will no longer need the group root to function, making 1001 the new default runAsGroup. This setting can be reverted by setting runAsGroup back to 0.
Enabling usage of immutable filesystems
Using immutable filesystems is a mandatory requirement of security checklists such as NSA or MITRE. This configuration helps enforce an immutable infrastructure strategy; the container only needs to write on the mounted volume that persists the state. An immutable root filesystem is also capable of preventing malicious binaries from writing to the host system. To enable use of immutable filesystems, we changed all writable paths of containers to emptyDir volumes. In some cases, we needed to add extra init containers that copy folders like conf, plugins, or logs. This is necessary because mounted volumes replace the contents of the original folders. It’s important to note that this may cause issues with customization scripts, such as initScripts or the use of custom command and arg. Using older versions of Bitnami containers may cause problems because they might lack the necessary bash changes to allow readOnlyRootFilesystem. This setting can be reverted by setting readOnlyRootFilesystem back to false.
Ensuring no pod is without a resource request or limit
Having pods without any resource requests or limits is increasingly discouraged as these containers may deplete node resources. Currently, our charts warn users if the resources object is not set. Additionally, we have the resourcesPreset value to assist users when testing different resource configurations, but this is not recommended for production. With the new changes, we set the resourcesPreset value to the minimum size that operates in our internal testing. This size is not the recommended size by the Bitnami team, but it is the minimum size for basic testing of the solution. It is critical that users set resource values according to your requirements and use case.
Enabling functioning in OpenShift restricted-v2 SCC
Before our changes, Bitnami charts did not function in Openshift restricted-v2 Security Context Constraints(SCC) because they set user and group to 1001. To address this, we enabled the automatic adaptation of the containerSecurityContext and podSecurityContext sections when running in Openshift installations. If the detected platform is Openshift, the values runAsUser, runAsGroup, and fsGroup will be automatically removed, allowing the Openshift platform to select the appropriate user and group IDs.
Using the Tanzu OSS Health Assessment to understand the impact of these changes
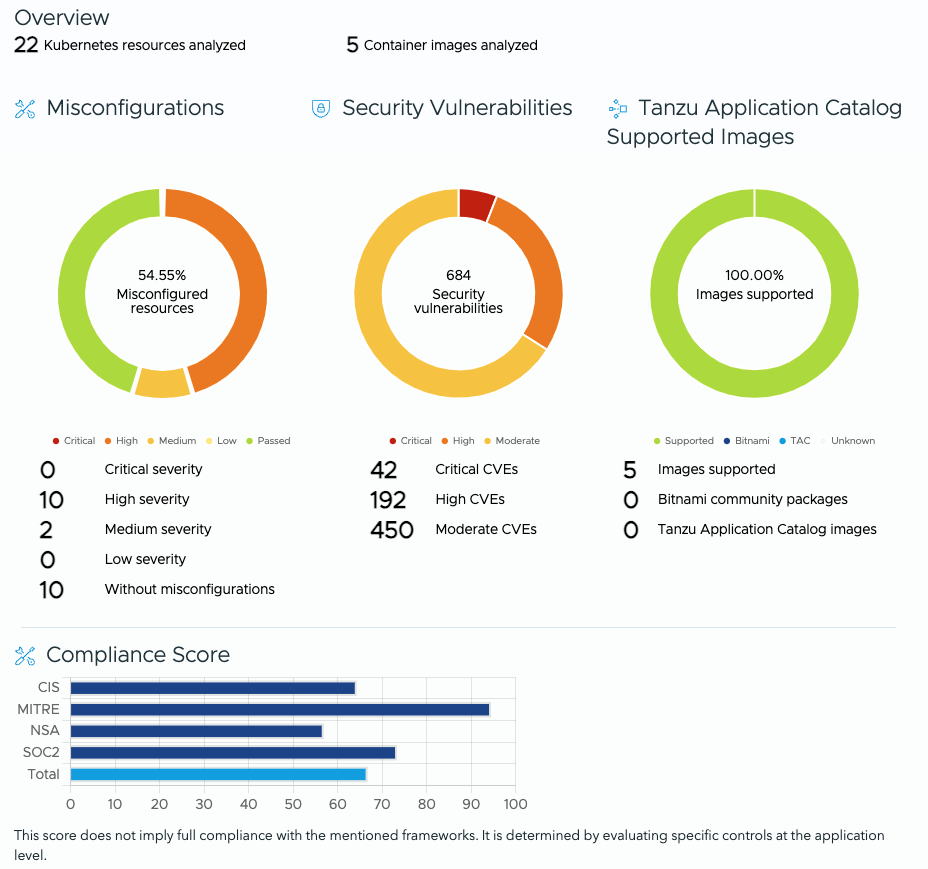
As you can see, the percentage of Misconfigured resources were 54.55%.
Now let’s look at the health assessment report of the same Helm charts after the implementation of our improvement measures.

From the snaps, you can see that misconfigured resources have dropped from 54.55% to 17.39%, implying a significantly better security posture, thanks to the aforementioned improvements.
You can also see that the security vulnerabilities plummeted from 684 to just 4. This drop is due to the fact that the Bitnami Helm charts are sourced from Tanzu Application Catalog with Photon OS as the base image, and not the standard Debian OS (which is the base OS for the community edition of Bitnami packages).
Thus, the recent security improvements in Bitnami-packaged Helm charts combined with Tanzu Application Catalog’s capability to let you use the VMware by Broadcom-maintained Linux distro—Photon OS as the base image can help you improve your security posture and minimize risks from your open source software dependencies.
Next Steps
To solve problems you may have with the Bitnami community packages—including deployment support, operational support, and bug fixes—please open an issue in the Bitnami Helm charts or containers GitHub repository. You can get the latest Bitnami-packaged software from our website, DockerHub (containers and Helm charts), Google Marketplace, Azure Marketplace, or AWS Cloud Marketplace. If you want to use Bitnami packages in production environments for mission-critical use cases, check out Tanzu Application Catalog—an enterprise version of Bitnami Application Catalog with several exclusive features that include base OS customization, app-level customization, Vulnerability Exploitability eXchange (VEX), and more. Take our OSS health assessment today and kickstart your journey toward the optimization of your open source software dependencies.